User Manual
License
anise is written by Josef Hahn under the terms of the AGPLv3.
Please read the LICENSE file from the package and the Dependencies section for included third-party stuff.
About
Anise is a Python-based execution engine for automation tasks.
Automation tasks exist in software development, and probably all kinds of other sectors. They typically require the execution of different smaller and larger tools. Complex tasks often need a sequence of many steps to execute, with some steps having dependencies to each other. Manually triggering all these steps in the graphical interfaces of all the involved tools is possible in theory, but will generate errors and frustration after some cycles.
The automation interfaces of those tools are sometimes easier, but sometimes they are error-prone. Some tasks may also need to ask the user for some information in an interactive way. Some smaller parts might also be machine-specific (e.g. filesystem paths or the code how to access a password vault), while the entire task must be runnable on some different machines. In some situations, this can lead to a rather intransparent forest of different tools, with unique oddnesses and special conventions. As the number of different project increases, you will see more and more different tools, often doing a similar job, but for different platforms or frameworks and, of course, with different usage conventions. Spontaneously written glue scripts help in the beginning, but will explode as the complexity exceeds some threshold.
Typical tasks in software development could be:
Generating documentation
Testing
Automatic code generation
Creating packages
Creating a homepage, automatically built from the available version information, the packages, the documentation and so on
Deploying this homepage to a web server
Handling version information - e.g. print it in the manual
and many more
The Anise framework allows you to implement all those tasks in a structured but generic way in a combination of XML and Python code. Once you have created this stuff at a defined place in your project, Anise lets you easily execute your tasks from command line (or from any editor if you embed it somehow). This gives you a common and easy interface to all your ‘tool glue’ code.
The Anise engine executes arbitrary Python source code and provides some additional services like logging, parameter passing from command line, basic graphical user interface support, a plugin interface, a flexible event system, injecting code and data from other place, dependencies between code fragments, and more.
On top of this engine, Anise comes with a bunch of implementations that fulfill tasks (or parts of them) of software development. There is a testing module, a documentation- and homepage-generator, some package building methods and a lot more. The implementations use the event system in many places in order to allow customization in a somewhat technical but very flexible way. Even so, those implementations are rather specific and it depends on the particular case, if, and how many of those implementations are useful.
Up-to-date?
Are you currently reading from another source than the homepage? Are you in doubt if that place is up-to-date? If yes, you should visit https://pseudopolis.eu/wiki/pino/projs/anise and check that. You are currently reading the manual for version 4.3.6278.
Maturity
anise is in production-stable state.
Dependencies
There are external parts that are used by anise. Many thanks to the projects and all participants. Some installation methods might handle dependency installation automatically, while others leave that up to you.
 Python 3.7, required
 Typical GNU/Linux Desktop, recommended
 PyQt5 incl. WebEngine, required (has alternatives) : for some user interface enhancements; you can comfortably work without it (inside the browser then)
 subversion, optional
 git, optional
 font ‘Symbola’, included : for logo symbol; free for use; copied from here.
font ‘Khula’, included : for websites; by Erin McLaughlin; copied from here.
font ‘Inconsolata’, included : for websites; by Raph Levien; copied from here.
banner image, included : _meta/background.png; license CC BY-SA 3.0; copied from here.
third-party project logos, included : from some projects (see their websites for details).
all files in /_meta, included : if not mentioned otherwise, Copyright 2015 Josef Hahn under license CC BY-SA 3.0 license.
icon set ‘oxygen’, included : files ‘anise/data/icons/userfeedback’; license see homepage.
Introduction
Please read how to make Anise ready for the first steps in Appendix: Installation.
Typical usage scenarios
In very general words, the About section already described some scenarios, in which Anise could bring substantial advantages in terms of ergonomics, reliability and quality for your processes.
Basically, whenever you are going to automate the interaction of many different tools, Anise provides you with an engine for your glue code. This can either mean to orchestrate a large sequence of tool executions and to fulfill the dependencies they might have. But a large field of small tasks, each just calling one or two of tools, is also worth considering to consolidate in a list of Anise projects. Instead of zillions of different usage conventions, you run all of them in the same way on top of Anise with always the same user interface. This also includes access to the Anise user interface foundation, which is be the basis for many kinds of user interaction in task executions as well as lots of graphical helpers and configuration guides.
While the Anise engine is open for lots of very different automation tasks, the program comes with a large list of ready-to-use implementations for some specific tasks around software development and package deployment. Those tasks can run some compilers, create tarballs, Debian packages and some more, can run some test frameworks, documentation generation via Doxygen (development documentation with a programming interface reference as well as textual documentation) and can build and deploy a project website. Some of those included tasks may be useful for certain scenarios. But in most cases it is probably required to actually implement most of the tasks (i.e. the glue between your tools), while Anise provides a scaffold and a common facade for them.
You will learn later about the The Anise execution model, the Programming Interface and about ways to actually execute tasks. You will also read a bit more about the specific task implementations later.
First steps
The first steps are to create a project description file for your Anise automation project and to fill it with an actual configuration. This section shows a simple example that helps for a very trivial but functional Anise project.
Start Anise from the start menu or execute anise on the command line. An Anise interface should come up, asking you for some action.
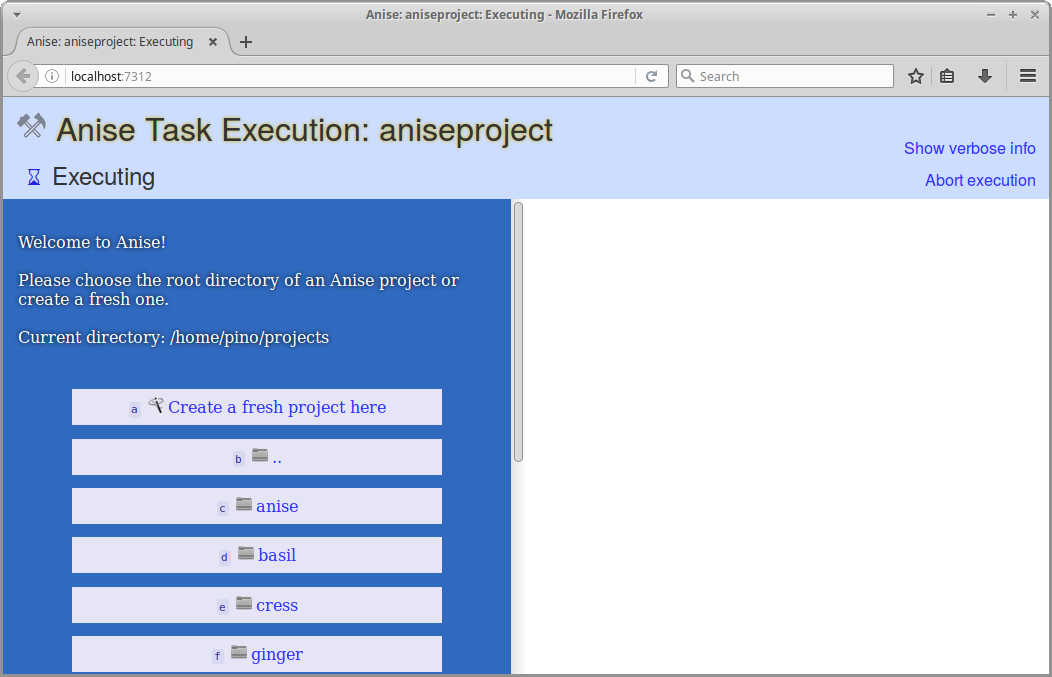
Choose the root directory of your project here. If you want to create a fresh automation project and you do not have any files yet, create a fresh directory for it somewhere beforehand.
Select ‘Create a fresh project here’ when you have reached the project root directory. This creates the file _meta/_projectdesc (Windows: _meta_projectdesc), which is called the project description file. This file can either be edited manually with an arbitrary text editor or in a guided way.
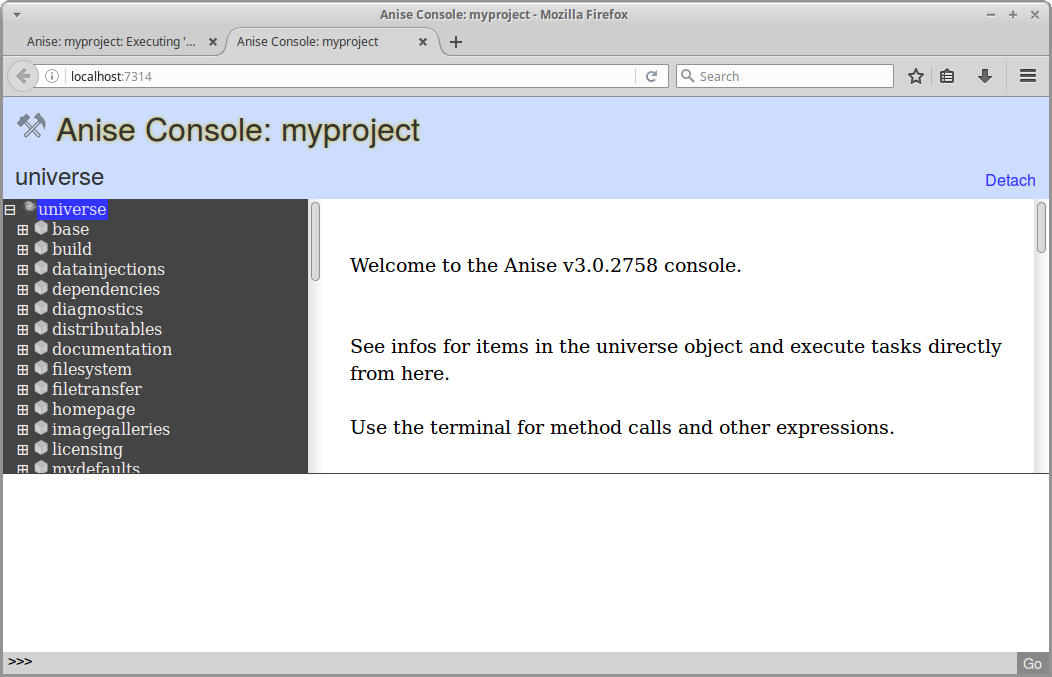
For a fresh project, the Anise Console will open (for an unfresh one, the console is still available as task
console from the task chooser). It contains all kinds of configuration guides and is useful in other situations as well as we see later.
Find the “Manage Tasks” action in the main part, trigger it and follow the on-screen instructions.
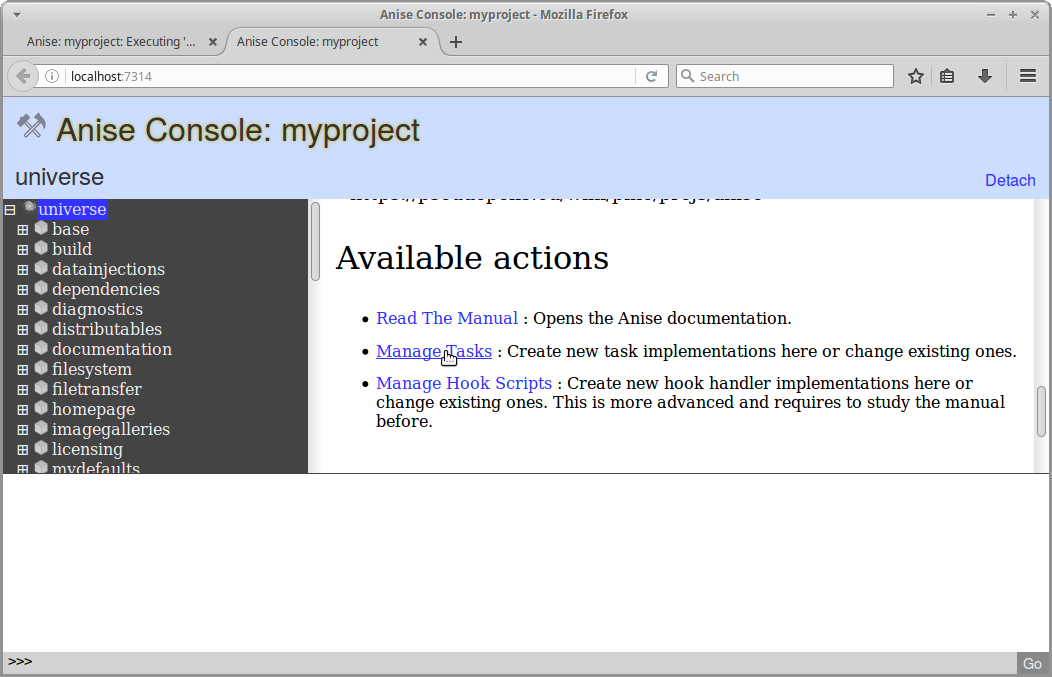
In the end, you should have a new task with a more or less useful Python implementation added to your project.
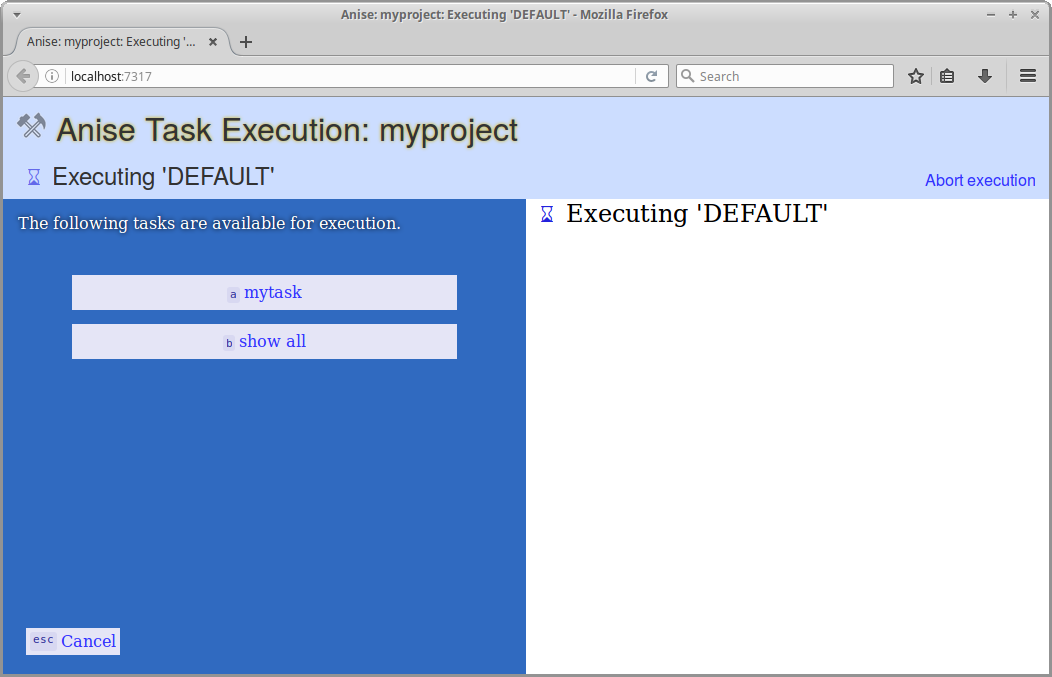
After closing the console, execute anise again for a task chooser or anise mytask for directly executing the task mytask.
You will find more details about the console in the Anise console section.
The Anise execution model
The execution model describes what the Anise engine actually executes and which runtime environment and infrastructure it prepares for a task implementation.
The universe object
The universe object is the central part of the execution of tasks. It is one global data structure, which contains all the information for executing tasks. This includes all the metadata, like the project’s name, maybe its license and so on, as well as all task implementations.

You will learn later how to get and manipulate this object in different situations.
Tasks
A task is the piece of program logic for execution on the Anise engine. Each automation action of your project is to be implemented in one task.
Technically, a task is just a simple Python function (for people who already took a look at _meta/_projectdesc: anise.features.base.pytask() is just a small wrapper around that fact) that is available as a member of the universe object. It must not require any arguments, otherwise the engine cannot execute it as a task. Instead, member variables from the universe objects or user interaction are used for getting information or parameters from outside.
In First steps you already created a task in a very direct way. Later parts will also show more indirect ways of creating tasks.
The project description file
The project description file must be either in the _meta subdirectory (recommended!) or in the root directory of your project and must be named _projectdesc. All configurations and every relevant piece of information about your project are specified in this file. The complete Anise operation will run just on top of it (this is not entirely correct, but correct enough for the moment).
You might already have created the initial version of this file in the First steps. This file contains an xml document in an Anise-specific format. The general structure is the following:
<?xml version="1.0" ?>
<aniseprojectdesc>
    <val k="name" v="myprojectname"/>
    <val k="base.version" v="0.1"/>
    <let k="somefeature.someobject.somemethod">
        <val k="someparam" t="str" v="foo"/>
        <val k="anotherparam" t="bool" v="True"/>
    </let>
</aniseprojectdesc>
This file essentially populates the universe object with information before the actual execution begins. The root aniseprojectdesc contains a list of val and let nodes.
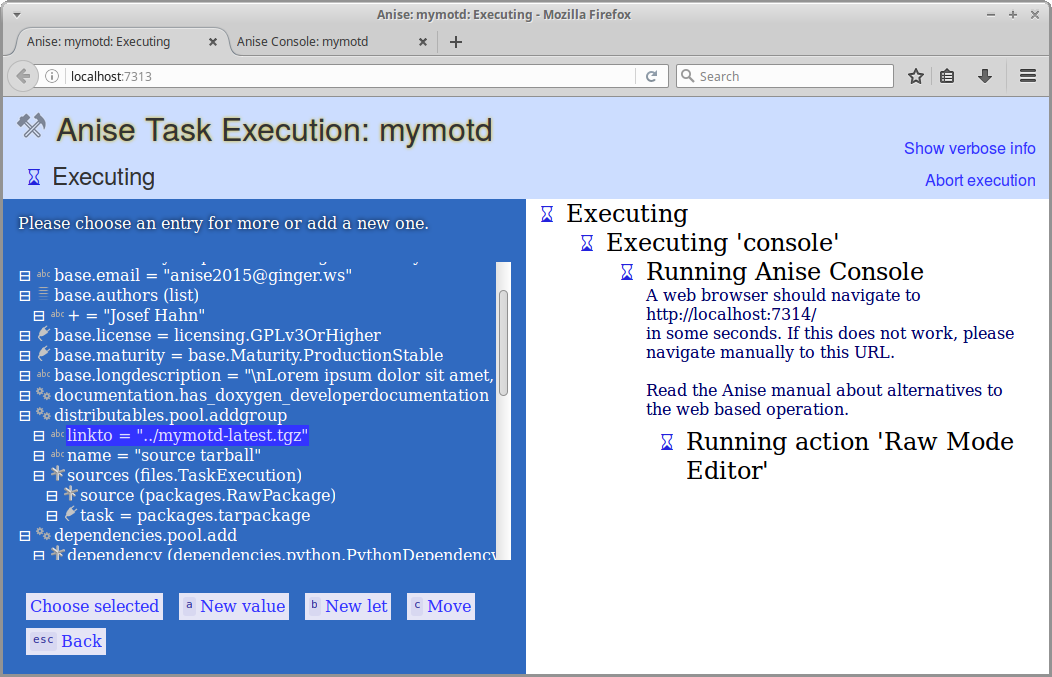
The raw mode editor
A graphical, yet not too abstract way to inspect and change the content of this file is the ‘Raw Mode Editor’. You find it in the console, listed in the ‘Available actions’ for the root node.
The val node
A val node assigns values to the universe object (at least if it is a direct child of the root node).
The k attribute specifies the member name used for storing the value in the universe object.
The value either has a primitive type like a string or a boolean or something composed like an instance of a Python class. The type is specified in the t attribute. If a val node defines a non-primitive value, it contains nested val structures for each constructor parameter.
The types list and dict exist as typical containers. They also contain nested val structures holding the actual content. For the former one, the child nodes must not have k attributes (since elements have keys in dictionaries but not in list)!
Those values will potentially be read by the task at execution time in order to configure what it does in detail.
Reference type
There is one more type; it has a very special behavior: A value of type objectref contains a snippet of python code that will be evaluated at the time the xml file is read. It may be something as simple as a variable name like <val k="base.license" oref="licensing.AGPLv3"/> or something more complex like <val k="sometext" oref="utils.basic.readfromfile('...')"/>, which dynamically generates the content for a variable.
Note
This evaluation happens very early. It is not possible to refer to values that become assigned in later stages, like the anise.framework.engine.HOOK_AFTER_PREPARATION hook.
The let node
A let node is a different way to populate the universe object. It does not directly lead to a new member in it, but it triggers a management function (do not confuse those functions with tasks; tasks could become executed in later steps if the user requested it), which in turn modifies some data structures of the universe object. This encapsulates some rather complex data structures and give you an easier interface to them (as an example, think about a function for adding a bunch of file names together with descriptions to an mediagallery data structure).
The k attribute specifies the full qualified method name that includes the feature name (the Features section will explain this term), maybe a sub-structure within it, and, of course, the method name - like documentation.pools.add.
Parameter assignments to this function are specified with val subnodes. The k attributes of them specifiy the names of the parameters. As a shortcut, string parameters are also allowed to be written directly as attributes of the let node.
Executing tasks
Once a project description file is created and configured, the user primarily runs Anise for executing tasks. Which tasks are available is specified - although often in an indirect way - and/or parameterized in the project description file. Assuming to have a dorelease task available, simply call
anise dorelease
in a command line from the project directory. If this call returns a result value, it is written to the terminal. Find a description of command-line options below.
The hook system
The hook system is a simple and flexible event mechanism. The Anise engine itself as well as various parts of feature implementations use them for loosely working together. It is one of the most important and visible mechanisms in Anise.
Events are represented by a name string that typically is available as a constant somewhere. The name of this constant typically begins with HOOK_, like in HOOK_MYEVENT.
HOOK_MYEVENT = features.Hook()
A feature can register some handlers to it. Those will eventually be executed when the event is triggered.
Some piece of code may feel responsible for providing (resp. triggering) this event. It does so by asking the Anise infrastructure for a list of all registered handlers and executing them. The exact event execution model is up to this provider. It may execute all registered handlers, parts of them or cancel the execution when some conditions arrive.
You find more infos and sample code in … use hooks and … define and trigger hooks.
The exact meaning of the phrase ‘hook’ may differ from case to case: Sometimes it means an event itself, e.g. the notional HOOK_MYEVENT. In other situations it means a single handler for an event. It should be clear by the context which meaning applies.
The Anise programming interface
The Anise Programming Interface provides ways for automation projects to interact with the Anise infrastructure. This section gives a coarse overview of all the building blocks and how they play together. It also touches some of the internal parts.
After reading the manual, the best way to get a less abstract knowledge is to take a look at Appendix: Recipes, how to.
There is also an API reference available, which gives detailed information about the existing classes, functions and parameters. Whenever the manual refers to those items (they all begin with anise.), it is a good idea to read the reference as well. It often contains lots of relevant additional details.
Framework
The package anise.framework contains the core foundation. The Anise engine resides here as well as its auxiliary data structures and object classes. Find those modules (and some more) in this namespace:
anise.framework.engine: The Anise engine and some direct helpers.anise.framework.projects: This module read and writes project description files and implements The universe object (inanise.framework.projects.Universe) as well as the interaction between those parts.anise.framework.features: The Anise plug-in system (typically called ‘features’). The entire high-level functionality of an Anise project (the custom one as well as included one) comes as a ‘feature’. This module does not contain any actual features but just the framework logic for loading and running them. More details are described in the Features section.anise.framework.exceptions: Anise exception types.anise.framework.files: Some data structures for working with file hierarchies.anise.framework.report: Keeps progress information and output text of the task execution.
Features
Anise features provide the complete high-level automation functionality. Each available feature is plugged into the engine on startup. By adding handlers to some hooks, it can execute initialization steps for bringing some configuration data structures in place. Those are configured according to the actual project needs in the project description file. A feature can also provide task implementations - either for manually adding them or automatically added to the universe object and thereby directly ready for execution.
Manually adding a task is possible with anise.framework.projects.Universe.addtask(), as some examples later on will show.
The namespace anise.features contains all features that are included in Anise. Some of them fulfill rather special tasks, but others are more generic, maybe even have infrastructure characteristics, and often used by other features as well.
Referring to items of features from within a project description file requires a name in Python module notation relative to the feature loading locations! This means, for the features included in anise, the prefix anise.features is to be omitted.
<?xml version="1.0" ?>
<aniseprojectdesc>
    <let k="releasing.tasks.add" destination="/tmp/mymotdserver/">
        <!-- this is from anise.features.releasing --> ...
    </let>
    <let k="dependencies.pool.add">
        <!-- this is from anise.features.dependencies --> ...
    </let>
</aniseprojectdesc>
Note
Although the developer reference contains documentation about anise.features as well, the value of it is restricted due to its static nature. The relevant parts of most features appear at runtime by means of dynamic initialization routines and can differ depending on the configuration and situation. For a deeper understanding how an existing feature works, it is a much better approach to inspect it in the Console.
Sub-features
A feature name may be identical to a namespace that contains sub-items, similar as it is with Python modules. Due to that, there might be a feature foo, but also some sub-features foo.abc and foo.xyz.
Utils
The package anise.utils contains basic utility functions and low-level counterparts of many of the included features. They are often more flexible on the one hand, but more technical on the other hand. They also do not use the Anise infrastructure (there might be rare exceptions for some reasons), so they also do not interact with The universe object.
They are used by the Anise features, but are often flexible enough for being useful for custom features as well.
More about executing Anise
The anise executable can be called directly from a start menu link or from command line. It must be called from the root directory of your project (important also for start menu links). It is used for executing your tasks and for guided configuration (which can be more convenient than editing the xml file). The Appendix: Command line lists all available parameters.
This tool runs either in web mode or in terminal mode. The web mode is much more comfortable and is the default. There is nothing special to know for the user and no special requirement. It just needs to start a web browser. If this is undesired, please add :samp:` –no-gui` to your anise command. The same functionality is available in terminal mode as well, but the usability of the web mode is much higher.
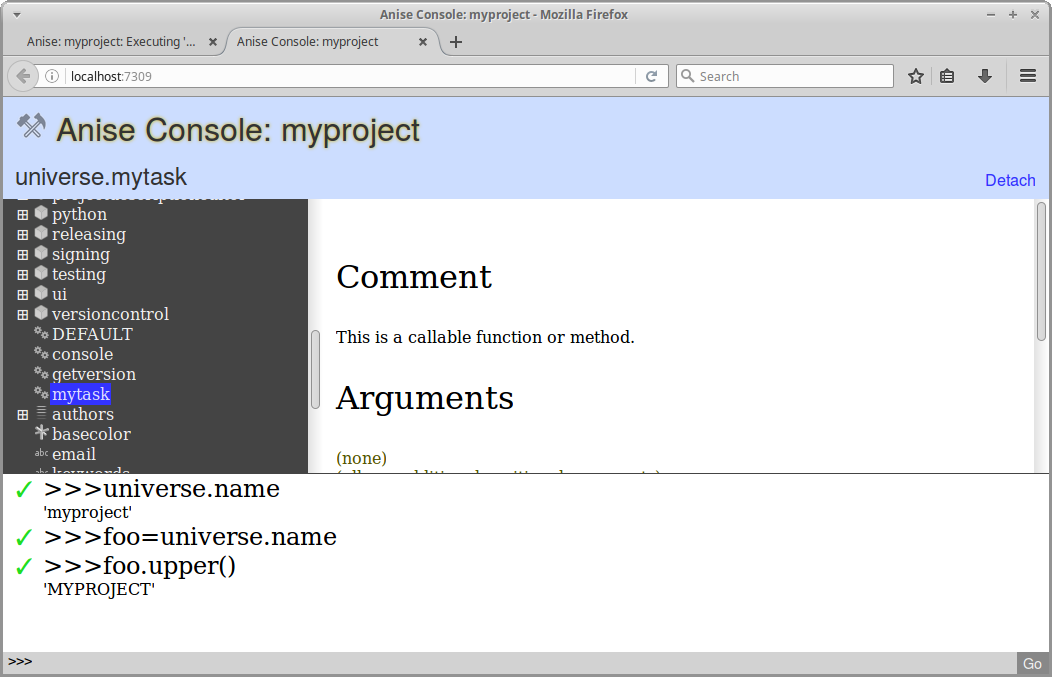
Anise console
The Anise Console is a tool for inspecting the universe object at runtime and to run various configuration tasks. More than that, it is a swiss army knife for issue diagnostics and feature development. The console is available as the console task from your task chooser, but is also started automatically when you create a fresh project description file.
Window parts
The console is made up of those parts:
In the top part, there is a header that shows some general infos and actions.
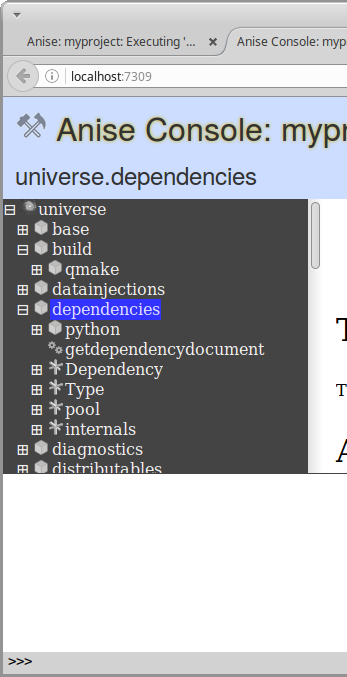
A tree on the left side shows the runtime content of The universe object.
The info panel on the right side of the tree shows detail information about the node that is selected in the tree. It lists (amongst other things) actions that are available to execute directly in the console. Those actions contain graphical configuration guides as well as ways to interact with object in the console.
The terminal in the bottom displays processing output and allows to directly execute Python expressions.
Be aware that all object modifications you make in the terminal are volatile. They are able to modify the current state of The universe object, but they do not change the project description file. When you start Anise again, the old values will be back.
Configuration guides
As noted before, many Feature nodes provide configuration guides. Find those nodes by the ‘package’ symbol and select them in order to find those guides.
Warning
The configuration of your project description and the runtime content of your universe object are two different things! At startup, the latter is created from the former one, but afterwards they are decoupled. Whenever you make any configuration changes in the console, you have to start a fresh Anise session in order to see the changes applied to your universe object.
Appendix: Command line
The Anise command-line tool understands this syntax:
anise [taskname] [options]*
If a taskname is given, Anise will execute this task. Otherwise it will execute the DEFAULT task, which typically is a task chooser.
Options can be some of the following:
--projectfile [file] : Use this project file (instead of the typical location)
--loadfeaturesfrom [path1:...:pathn] : Sets the paths for loading modules (separated by “:”; builtin features by “builtin”)
--debug : Enables debug log output
--keeptemp : Do not remove the temporary stuff (for post-execution diagnostic)
--no-autoopen : Never automatically open files after execution
--no-gui : Do not try to use graphic mode for user interaction
--createfresh : Create a fresh project description file
--s:key=value : Sets a value to the universe object before execution; also works with
i,bandfat the beginning for integers, bools and floats instead of strings--help : Shows this help text
The easiest way to begin working with an unknown Anise project is to open the graphical task chooser by just calling anise.
Note
Users of the Anise package for Windows need to open the ‘Anise Shell’. Calling anise the above way is possible from within this environment only.
Appendix: Recipes, how to
… use the included high-level features
The included high-level features of Anise are all visible in the Console. The easiest way is to check the interesting feature nodes there and use configuration guides provided there. Those often give only access to basic functionality and sometimes no guides are implemented at all. In such cases, use the documentation of the subnodes in order to understand how to use the feature.
… implement custom functionality
There is a two different ways to add custom functionality:
The quick-and-dirty way
Use the ‘Manage Tasks’ action in the root node of the console in order to add an own task. You will then find this task in the task chooser and also execute it directly with anise mytask.
More flexibility brings the ‘Manage Hook Scripts’ action, which allows you to add handlers for hooks and so can add a much broader range of custom functionality. For more infos about a particular hook, find its node in the console and read what the info panel provides. Also read … use hooks. A hook script is executed in a very similar way as custom features (i.e. the clean way), so the following recipes typically can be used this way as well.
Both approaches will insert the customization code into your project description file.
The clean way
Implement your custom functionality as an Anise feature and add it to your Anise installation. The entire custom automation code of your project then has the same technical form as the included features. They all use the same infrastructure and are loaded and executed in the same way.
For adding custom logic this way, create a new file for your new feature and name it like myfeature.py. In order to actually add it to the Anise loading sequence, place this file into $HOME/.anise/features (for Windows users, this is %USERPROFILE%.anisefeatures). Placing it deeper into subdirectories give composed feature names, as explained above.
This file will be loaded by the Anise engine in a very similar way as Python would load plain modules. However, the feature loader makes the feature available as a member in The universe object (and also some bookkeeping stuff). The feature code typically defines some functions and classes for different reasons (see other recipes). It does not directly execute code, but may mark some of the defined objects as hook handlers, so adding all kinds of custom functionality to the Anise execution for all projects (since it is not bound to one project description file anymore).
For executing some code in the initialization of the universe object, the feature could like like this:
from anise.framework import engine
from anise.framework import features

@features.hookhandler(engine.HOOK_AFTER_PREPARATION)
def somefoolishinitialization():
    print("Hello World.")
This uses the anise.framework.engine.HOOK_AFTER_PREPARATION hook, which is triggered in the initialization of the universe object. Details about the existing hooks can be found in the Console. Find the hook nodes in the universe object tree and read what the info panel provides about them. Also read … use hooks.
… implement tasks
A task is a Python function that implements a particular automation routine. Whenever the Anise engine executes a task, it gets the implementation (the Python function) by taking a particular member of The universe object and calls it.
A very easy way to add a new task (with some restrictions) is described in … implement custom functionality. The following shows how to add a task to the universe object in a feature implementation:
from anise.framework import engine
from anise.framework import features
from anise.framework.projects import universe

def somecrazyfunction():
    print("Hello World.")

@features.hookhandler(engine.HOOK_AFTER_PREPARATION)
def somefoolishinitialization():
    # of course we can also write arbitrarily complex code here,
    # which dynamically creates tasks depending on some conditions.
    universe.addtask(somecrazyfunction)
This feature allows you to directly execute mytask (e.g. from the task chooser or from command line) on all your Anise projects.
… define and access variables
The values defined in the project description file become members of The universe object at runtime, as well as the defined lets indirectly assign further members.
At runtime, they can be read and modified in the very same way as you would do with any other Python object member. The anise.framework.projects.universe object is the current universe object. You will see this used in virtually every part of automation code, since it is ‘the’ global data and control hub for the entire automation logic.
from anise.framework.projects import universe

def sometask():
    universe.name2 = universe.name.upper()
    print("Your project name: " + universe.name2)
Last but not least, you can also set (primitive) values on the command line.
… output or log messages
The Anise logging foundation can (and should) be used for all kinds of output. Read this example and anise.utils.logging for more details:
from anise import utils

...
def foo():
    ...
    utils.logging.loginfo("Hello World.")
    utils.logging.loginfo("Hello World 2.", printcaller=False)
Note
User dialogues, which are explained later, force the user attention, while logging is the right way for monologue-type communication.
… load external features
For accessing stuff from an external feature, in most situations, it is enough to directly access the corresponding parts of the universe object, like this:
from anise.framework.projects import universe

...
def foo():
    ...
    universe.someotherfeature.someobject.foo = 42
    universe.someotherfeature.somemethod()
From time to time it is required to explicitely load an external feature. Early initialization phases are an example for such situations, since the universe object might be not yet populated.
You can load a feature directly by means of the Anise infrastructure and access objects in a direct way. The anise.framework.features.loadfeature() function loads another feature by name and returns an anise.framework.features.Feature:
from anise.framework import features
foo = features.loadfeature("foo").featuremodule
x = foo.some_object_in_foo
… use hooks
The hook system is the Anise event mechanism. Customization of Anise behavior virtually always has to do with hooks in some way. An existing functionality (either something from the Anise engine, from included features or from custom features) can define and export a hook in order to provide an interaction point where new customization can plug in. It triggers the hook in some situations (i.e. it calls all registered handlers), so the external parts can act and influence the process, behavior or result of something.
In former recipes you already have seen how to use a hook by registering a handler to it. Before you can do so, you must find out which hook you want to use (e.g. from the documentation of the feature or part you want to customize or by finding it in the console). You also have to find out the calling convention: Some hooks assume that classes are registered as handlers, while others work on function. For both of them, the argument signature must be known as well (for classes this is the constructor’s signature). Find out those details in the documentation, so you are able to write a handler. For some hooks, the Manage Hook Scripts console action is able to create a valid skeleton.
The anise.framework.features.hookhandler() function decorator is used for registering a hook handler in a feature:
from anise.framework import engine
from anise.framework import features
from anise.framework.projects import universe
from anise import utils

# yet another hook with trivial argument signature
@features.hookhandler(ui.HOOK_UIMODE_SELECTED)
def foo():
    utils.logging.loginfo('UI mode: ' + str(universe.ui.mode))
… use hooks more dynamically
In some situations it is required to add hook handlers in a more dynamic way than in … use hooks, i.e. depending on some conditions.
The anise.framework.projects.Universe.addhook() function is used by program logic in order to add a hook handler:
from anise.framework.projects import universe

def myhandler():
    ...

def foo():
    ...
    if some_condition_fulfilled:
        universe.addhook(HOOK_SOMEHOOK, myhandler)
    ...
… control the order of hook handlers
If the order of hook handlers matter, the requires, provides and prepares arguments of the handler insertions can be used for controlling them (see anise.framework.features.hookhandler). All those arguments expect lists of strings, which are used for describing dependencies between handlers. The engine will automatically compute a valid order on top of this.
Note
The provides value specifies the ‘own symbols’, i.e. which condition it participates to fulfill. Even if you leave it empty, it always contains the feature name and the full name of the handler function or class. This makes it easier to refer to particular elements from outside even if it does not explicitly provide any symbols.
… define and trigger hooks
On the other side, some module can define a hook and trigger it in some situations in order to give external parties a way to customize the general behavior. The anise.framework.projects.Universe.gethooks() function is used by program logic in order to provide resp. trigger a hook. It returns all registered handlers for execution. Definition and execution is shown in the following example:
from anise.framework import engine
from anise.framework import features
from anise.framework.projects import universe
from anise import utils

HOOK_MYEVENT = features.Hook()

def mytask():
    result = 0
    # note how flexible you are with using the handlers
    for handler in universe.gethooks(HOOK_MYEVENT):
        result += handler()
    utils.logging.loginfo("Result: " + str(result))

@features.hookhandler(engine.HOOK_AFTER_PREPARATION)
def foo():
    universe.addtask(mytask)
The handlers are typically added from external features (so we need to use … load external features) during initialization, like this:
from anise.framework import engine
from anise.framework import features

# we assume the feature from above available as 'foo'
foo = features.loadfeature("foo").featuremodule

@features.hookhandler(foo.HOOK_MYEVENT)
def foo():
    return 13.37
Note
anise.framework.features.Hook has some optional parameters, which can be used for providing additional information about your hook. None of them are required for using it, but they may help configuration guides or other auxiliary components for getting a better idea about what your hook does.
… implement custom initialization steps
Use the anise.framework.engine.HOOK_AFTER_PREPARATION hook and … use hooks:
from anise.framework.projects import universe
from anise.framework import engine
from anise.framework import features
from anise import utils

@features.hookhandler(engine.HOOK_AFTER_PREPARATION)
def somefoolishinitialization():
    universe.somevalue = 123
    utils.logging.loginfo("Hello World.")
… implement configuration classes and functions
The configuration of complex aspects in the project description file is often realized with custom classes carrying the specified configuration. Those can be constructed directly with nested val nodes in the project description file. This encapsulates complexity and allows for easier specifications in the project description file.
...
class Foo:
    def __init__(self, x, y):
        ...
can be used this way in the project description file (either as root value, as nester value or as a parameter somewhere):
<val t="myfeature.Foo">
    <val k="x" v="foobar"/>
    <val k="y" v="baz"/>
</val>
Configuration helper functions are small program routines. They are another way to provide a convenient configuration interface to some functionality for usage from within the project description file. They are used by means of an The let node in order to allow complex configuration specifications. It has somewhat similar use cases as the former point. However, since the former is a class and the latter is a function, there are all kinds of technical details that make either the one or the other match better to a particular situation.
...
def foo(x, y):
    ...
can be used this way in the project description file:
<let k="myfeature.foo">
    <val k="x" v="foobar"/>
    <val k="y" v="baz"/>
</let>
… interact with the user
There are some methods that implement typical user interaction patterns. At runtime, they are available in The universe object as ui.userfeedback. Read the documentation of anise.features.ui.Internals.UserFeedback for
all available methods and the following example:
from anise.framework.projects import universe

...
def foo():
    r = universe.ui.userfeedback.message("How are you?",
                                         btns=["Great.", "Not so good."])
    if r == 0:
        universe.ui.userfeedback.messageok("I'm glad to hear that!")
    elif r == 1:
        universe.ui.userfeedback.messageok("That's bad news :-(")
… read and modify the project description file
Some functionality aspects - typically configuration guides - need to read and write the project description file in a program routine. There is a programming interface available for those operations in anise.framework.projects.IntermediateStructure. The following example shows some usual operations:
from anise.framework.projects import universe
from anise.framework import projects

...
def foo():
    ais = projects.IntermediateStructure.fromfile(universe.specialpaths.projectfile)
    newletentry = projects.IntermediateStructure.Let("some.functionname")
    ais.addentry(newletentry)
    newvalentry = projects.IntermediateStructure.Value("bool", v=True)
    ais.addentry(newvalentry)
    newvalentry2 = projects.IntermediateStructure.Value("some.ClassName",
        foo=projects.IntermediateStructure.Value("objectref", oref="some.other.object"),
        bar=projects.IntermediateStructure.Value.fromstring("Horray.")
    )
    ais.addentry(newvalentry2)
    ais.removeentry(newvalentry)
    newvalentry2.removearg("bar")
    ais.save()
… implement configuration guides
The guided editors typically come somehow together with the corresponding features (although in Anise itself this relationship is realized differently). They include some graphical assistants for doing typical configuration handling.
A configuration assistant implements the anise.features.projectdescriptioneditor.ProjectDescriptionEditorAssistant interface and is registered as hook for anise.features.projectdescriptioneditor.HOOK_GET_FEATURE_ACTIONS.
They provide a filtered overview to the The project description file and can offer some custom actions in the overview. Those custom actions use the user interaction methods for communication with the user. They also need to work with the project description.
from anise.framework.projects import universe
from anise.framework import features

projectdescriptioneditor = features.loadfeature("projectdescriptioneditor").featuremodule

@features.hookhandler(projectdescriptioneditor.HOOK_GET_FEATURE_ACTIONS)
class MyAssistant(projectdescriptioneditor.ProjectDescriptionEditorAssistant):

    def __init__(self):
        super().__init__("Manage miracle", "Specify which miracles shall occur in your project.",
                         "mymiraclefeature")

    def getcustomactions(self, ais):
        return [projectdescriptioneditor.CustomAction("Add new miracle",
                                                      self._add_miracle)]

    def _add_miracle(self, ais):
        name = universe.ui.userfeedback.input("Please enter a name for the miracle.",
                                              "Peace in the world")
        ...

    def getentries(self, ais):
        r = []
        for node in ais.entries():
            if node.islet and node.key == "mymiraclefeature.pool.add":
                r.append(e)
        return r
Additionally, you can register custom actions for particular kinds of nodes (instead of custom actions globally available in the overview). Those custom actions are easily accessible from the overviews and are also available in the Raw Mode Editor. Implement them this way:
from anise.framework.projects import universe
from anise.framework import features

projectdescriptioneditor = features.loadfeature("projectdescriptioneditor").featuremodule

@features.hookhandler(projectdescriptioneditor.HOOK_GET_PROJECTDESCRIPTIONNODE_CUSTOMACTION_IMPLEMENTATIONS)
class MyNodeCustomAction(projectdescriptioneditor.CustomAction):

    def __init__(self):
        super().__init__("Change miracle kind")

    def visible(self, ais, node):
        return node.islet and node.key == "mymiraclefeature.pool.add"

    def execute(self, ais, node):
        command = universe.ui.userfeedback.choice(...)
        ...
… implement configuration guides (more flexible)
More flexible (but with more own responsibilities) than the former recipe is this interface:
from anise.framework.projects import universe
from anise.framework import features
from anise import utils

diagnostics = features.loadfeature("diagnostics").featuremodule
projectdescriptioneditor = features.loadfeature("projectdescriptioneditor").featuremodule

@features.hookhandler(projectdescriptioneditor.HOOK_GET_FEATURE_ACTIONS)
class MyAction(diagnostics.FeatureAction):

    def __init__(self):
        super().__init__("Do Something", "Does something somehow.", forfeature="myfeature")

    def execute(self):
        utils.logging.loginfo("Hello World.")
… hide some internal stuff of my feature in the console
The console shows the complete tree of the universe object at runtime, which can decrease the visibility of the relevant objects and can weaken the clearness by means of lots of internal bookkeeping structures. In order to soften this effect, you can define all internal pieces of your feature in the ‘Internals’ subclass, like this:
...

def something_important():
    ...
    Internals.something_for_internal_usage(...)
    ...

class Internals:

    def something_for_internal_usage(...):
        ...
… provide some documentation for my custom stuff in the console
Use the Python docstring technique for providing documentation about functions and classes. You can use Doxygen notation in order to document function arguments.
def something_important(x):
    """
    This function does important things.
    :param x: Some important parameter.
    """
    ...
… create execution scopes for reporting progress details
A program routine can often be seen as an assembly (nested or sequential) of substeps. Technically those are often encapsulated in functions, but from a high-level perspective, the degree of encapsulation can also be broader or finer.
Your program code can specify those blocks as execution scopes. The execution environment will show those blocks to the user together with progress information.
Specify execution scopes this way:
from anise.framework.projects import universe

def foo():
    ...
    with universe.executionscope.newsubscope("Doing something hilarious"):
        ...
    ...
… deal with errors
The anise.framework.exceptions module contains special exception types for usage within Anise and the automation projects. It is a good idea for various reasons to consider using them in own raise statements. Sometimes it could also be required to use some of them in except clauses in order to react on a specific error situation.
… work with file structures
Instances of anise.framework.files.Filestructure are typical for exchanging files or complete file structures, including subdirectories and many files. Many included features use them as arguments or return them. There are also some subclasses that are useful in some cases, like anise.framework.files.TempDir.
You can create such objects this way (alternatively use one of the subclasses):
from anise.framework import files

def foo():
    ...
    x = files.Filestructure("/path/to/something/in/filesystem")
    ...
And use them by calling some of its methods, like this:
def foo(x):  # takes a files.Filestructure
    ...
    # this copies the file structure to a destination.
    x.dl("/path/to/some/destination/in/filesystem")
    ...
… use dynamic expressions in a project description file
In a project description file, a very generic tool are objectref values. They are defined by an arbitrary Python expression that becomes evaluated in initialization when the project description file is read.
<?xml version="1.0" ?>
<aniseprojectdesc>
    ...
    <val k="sometask" oref="some.feature.somemethod"/>
    ...
    <val k="name" oref="'MyPrOjEcTnAmE'.lower()"/>
    ...
</aniseprojectdesc>
… embed Anise in other tools
Since Anise has a powerful command-line interface, it is very easy to call Anise as external process from your tool.
The Anise engine can also be imported in other Python applications and can be triggered in-process. For details about the latter option, please read the source code of the anise.framework.engine module.
Appendix: Shallot plugin
There is an Anise plugin for the Shallot file manager available under _meta/shallot_plugin/. It embeds some Anise functionality (like executing the tasks) directly into the file manager.
Find information about the Shallot project on the same website as Anise. The documentation of it explains how to install this plugin.
Appendix: Installation
Install Anise via the installation package for your environment, if a suitable one exists for download. This also takes care of installing dependencies and doing preparation (unless mentioned otherwise in the installation procedure). After the installation, you can skip the rest of this section.
Source code archive
Use the source code archive as fallback. Extract it to a location that is convenient to you (Windows users need an external archive program; for example the great ‘7-Zip’ tool). Also take a look at the Dependencies for external stuff you need to install as well.
It is highly recommended to also establish a command line link or alias for anise/anise.py so you just have to type anise (ln -s ...anise/anise.py /usr/local/bin/anise on Unix or any other operating system specific way). This is according to what the installation packages do and required for executing the exact same commands as used in this manual (otherwise you must substitute the full name for the short command names in this manual).